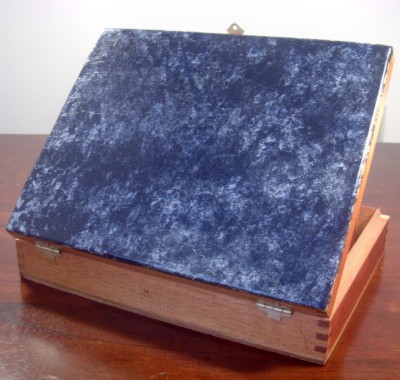
Faux finishing has been around for a really long time now. For some reason, I’ve never ever been able to figure it out. I’ve always been one of those people that’s like “Uh, it only looks easy. There‘s gotta be a trick to it that these experts just aren’t sharing.”
When Giani reached out and asked if I wanted to take their faux marble finish kit for a test drive, I was totally like “sure!” Their kits are designed to redo the counters in your house. However, I rent, and well, I would like to get my security deposit back.
I decided I was going to use the kit on a table or another piece of furniture and set off on an expedition. After looking for about a month, and not finding anything that really fit or was in my price range, I decided to go for the next best thing. I chose a couple of accessories to add a faux marble finish – a cigar box and a picture frame.
.jpg)
The kit comes with everything that you need to get started on your faux marble finish. There's a base coat, three intermediate paints, a sea sponge, two foam rollers, a foam brush, and a dvd.
The first thing I did was clean them with a little bit of Simple Green spritzed on a paper towel and let dry completely. Next, I sanded them down lightly and cleaned off any residual dirt or dust. I marked off any place I didn't want paint, with masking tape. Then, I put the base coat from the Giani kit down. It looks sort of like chalkboard paint. That has to dry for 8 hours, then you need to see if it needs a second coat. My box did, so I gave it another coat, and waited overnight. Again.
.jpg)
Next up was the second coat. This coat gets sponged on with the sea sponge applicator. I did have to practice to get my technique down, but it wasn’t too difficult. This coat has some mica or something in it to give it some shimmer and some depth of color. I was wondering if this layer is a little transparent, as the color did seem to deepen where there were multiple layers. Set that one aside to dry. It's starting to look like real faux marble!
.jpg)
The final color layer is a pearly white highlight. You need to go with a light touch for this one. I happened to get a little carried away on mine. It was easy to fix, though – I just added more blue, after the white was dry. That also added more depth of color. One good thing is that these coats dried quickly! I managed to get a good faux marble finish!
.jpg)
After letting those dry for a day or so, to make sure they’re really good to go, it was time for lacquer! I rolled this on with the included mini roller. I was sure to get it evened out with no roller marks. I let it dry, then gave it another coat. I like the high gloss look, though. I even considered giving the box and frame a 3rd coat. but thought that the 2 were enough.
.jpg)
Finished! I thought that these looked really, really good. I was honestly shocked at how well my box and frame turned out. I would totally recommend this Giani Granite Kit to anyone that wanted to add a marble faux finish a piece of furniture or counter. You could easily do a couple pieces of furniture with this kit.

